
Welcome to your free report covering the diagnosis, management and treatment options, exercises and equipment that could help in rehabilitation. Scroll down to read more.
Diagnosis
Patella Fracture or PCL Damage or Bursitis
Following a fall where you have pain on the front of your knee, were unable to walk away afterwards and are experience swelling, you may have suffered a patella fracture or PCL damage. Your patella, or kneecap, is a small round piece of bone which sits right on the front of your thigh bone and acts as an anchor point for the muscles on the front of your thigh, the quadriceps. If the force was large enough when you fell you may have caused this bone to fracture. If there is suspicion of a fracture your first line of treatment is to undergo an x-ray to rule out any bone damage. This is important because failing to address this initially will delay your recovery and it simply won't repair without some element of intervention. This x-ray can be organised through your emergency department, minor injuries unit or family doctor.
Another structure to be aware of in your knee is the posterior cruciate ligament, or the PCL. Ligaments are strong fibrous pieces of tissue which attach bone to bone and offer stability. Your PCL attaches on the top of your shin bone at the back, onto the bottom of your thigh bone at the front, and helps offer stability in your knee joint. If someone falls directly onto the front of their knee, struggles to walk afterwards and experiences swelling, they may have have damaged this ligament as it become overstretched. To assess the stability of this ligament a physiotherapist or family doctor will be able to perform a very simple test in their clinic. From this test they may or may not want to refer you for an MRI scan to determine if there is any damage of the ligament. One thing to mention at this stage is that not all PCL ligament injuries require surgery, and all options should be fully explored and discussed before a decision is made.
Given there is a suspicion of either a patella fracture or PCL damage your first step should be ruling out these conditions with an x-ray initially followed by an assessment with a clinician to assess the ligament of the knee.
Two other structures to be mindful of which may be highlighted during the x-ray process or assessment with the clinician is the retropatellar and bursa. From the fall you may have irritated the area on your knee called the retropatellar. This is simply the area between your kneecap and the thigh bone. If the force of the fall was high enough it could have caused your kneecap to hit the thigh bone causing irritation at this area. If there is a patella fracture you would expect some level of retropatellar bruise, but any treatment to address the patella , be it a fracture or a bruise, will also improve the retropatellar.
The other structure to be aware of in this area is a bursa. Bursa are tiny fluid filled sacs and you have a number of them in your knee which help with smooth movement of the tendons over the bony structures of your knee. These can become irritated by a number of causes, and one of those is by direct trauma to them. When the bursa are irritated it may lead to bursitis. The treatment for bursitis is very similar to that of a patella bruise in that you want to reduce the demand to the area to let symptoms settle and then slowly build up, and any treatment to address a potential patella fracture or PCL damage will also improve any potential bursitis which you may be experiencing.
Management
Click each phase heading to see the progression of your management programme.
This phase is normally the first 24-72 hours after the injury and the aim is to settle any swelling and pain you have. You will be able to apply the majority of the steps in this Phase alongside organising any x-ray or clinician assessment.
X-Ray and Assessment
Your first line of treatment should be to organise an x-ray to determine if there is any fracture of the patella. Please follow any specific instructions from the clinical team on timelines and activity limitations depending on the result of your x-ray.
If the x-ray showed no fracture it may be helpful for a physiotherapist or family doctor to assess your PCL. There is a simple test they can perform which will indicate to them if further investigation, such as an MRI, is needed.
RICE
RICE stands for Rest, Ice, Compression and Elevation. These steps are helpful for when you have an injury in the acute phase to help reduce pain and also with the healing process.
Rest: You need to reduce the activity level you are performing and let your body have time to heal. The aim here is to pace your activities throughout the day and cut back on anything unnecessary or that particular increases your symptoms. You may also find crutches at this stage are needed if the pain levels are too high for you to walk unaided.
Ice: This can help reduce the pain you are experiencing and also reduce some of the swelling. Using some frozen peas wrapped in a damp cloth for 20 minutes will work well here and do this every couple of hours if possible. Do not apply the ice directly to your skin, make sure you have a barrier which is preferably damp, and keep an eye out for any ice burns onto the skin. If you notice this stop immediately.
What can be helpful here is having a specifically designed ice pack you can reuse over and over again. You may still need to have that damp cloth as a barrier with these packs as well.
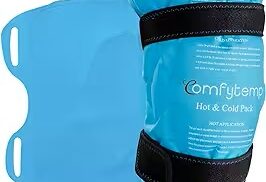
Compression: This relates to the use of the ice being compressed onto the knee. This can be achieved by simply wrapping a cloth around your joint, but more bespoke equipment offers this ability which would be more comfortable and effective, such as a knee ice pack. You may find that this aspect does not offer relief as the compression is discomforting, and in which case you should stop. Be conscious of any change in sensation in your foot or toes as a sign that this isn’t appropriate for you at this time.
Elevation: Having your foot rested on an object which is raised above your hips, whilst you are laying down, will reduce the amount of swelling in the area. This may help reduce some of the symptoms you are experiencing. Aim here for a similar time frame as applying ice and go for up to 20 minutes. Do not compress and elevate at the same time, as the volume of fluid returning towards your heart may put too much pressure on it.
Medication
In the initial phase the use of over the counter medication may be an option. Medications such as paracetamol may allow this acute phase to be more manageable. Some consideration in the use of ibuprofen at this stage should be given due to the evidence it may impact bone healing. Please consult your family doctor if you have any concerns with this impacting your current medication, or if any medical history may be impacted by the option of including this medication.
Support
If a fracture is seen on x-ray you may be required to use what is called a ‘cricket splint’ knee brace. This is a brace which limits the movement of the knee and gives it an opportunity for it to heal properly. You need to make sure the brace you are using is long enough to limit knee movement thanks to its solid structure, as a knee brace which is too short won’t give enough support.
Unfortunately knee brace options for PCL injuries, and to an extent ligament injuries in general, is a little less straightforward.
There are specific braces designed to offer support for PCL and ACL injuries which, thanks to their design, limit the movement and force on the knee in very unique ways. These braces are fairly expensive and would require a fitting by a specialist, versus trying to pick one off the shelf to do it yourself. However they certainly have their place and would be an option to explore if you needed one.
There are general hinged knee braces which offer an element of support for the knee which may be suitable in the interim either before committing to a more expensive brace, or perhaps if you have such a low level injury this option is suitable just to help support the knee whilst your injury settles.
Be cautious with any brace which is cheap and without proper support as this will unlikely offer any benefit. Something like a general neoprene knee brace is probably not going to be particularly helpful for you right now.
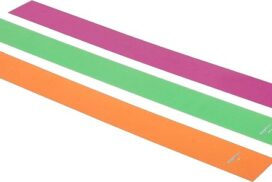
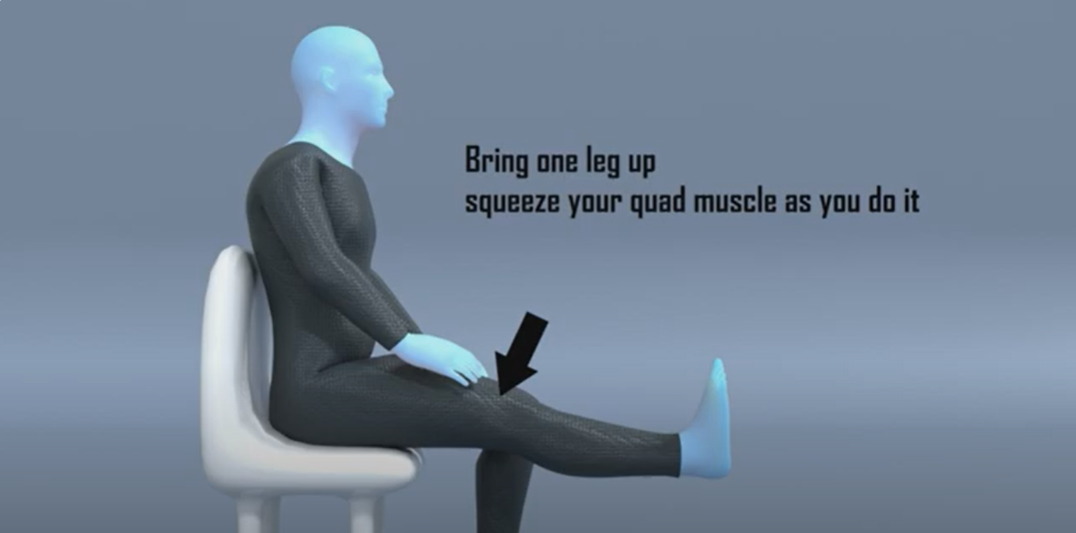
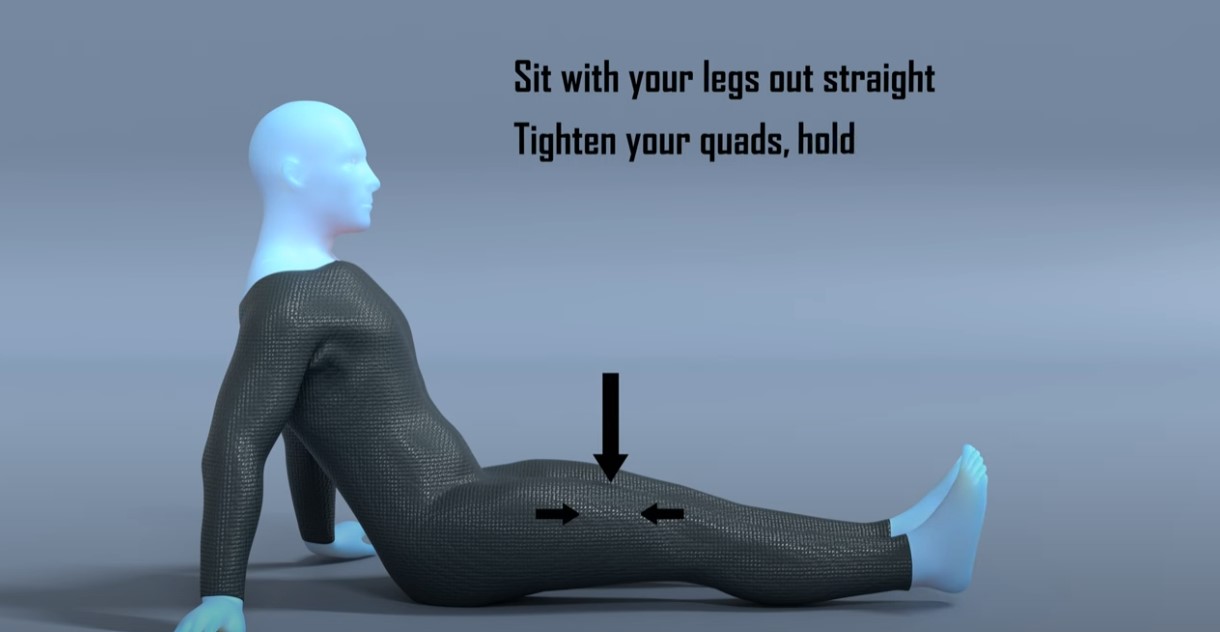
Exercises
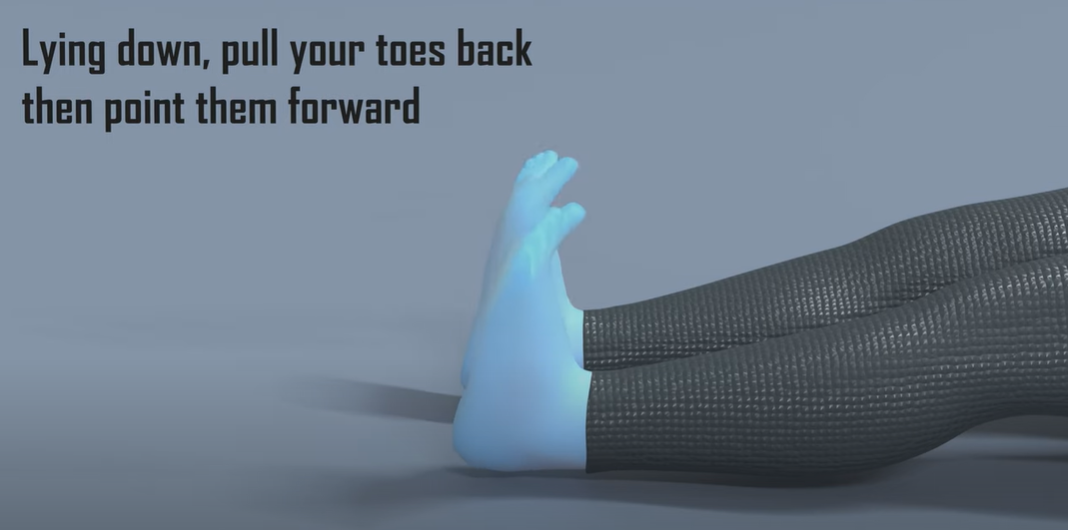
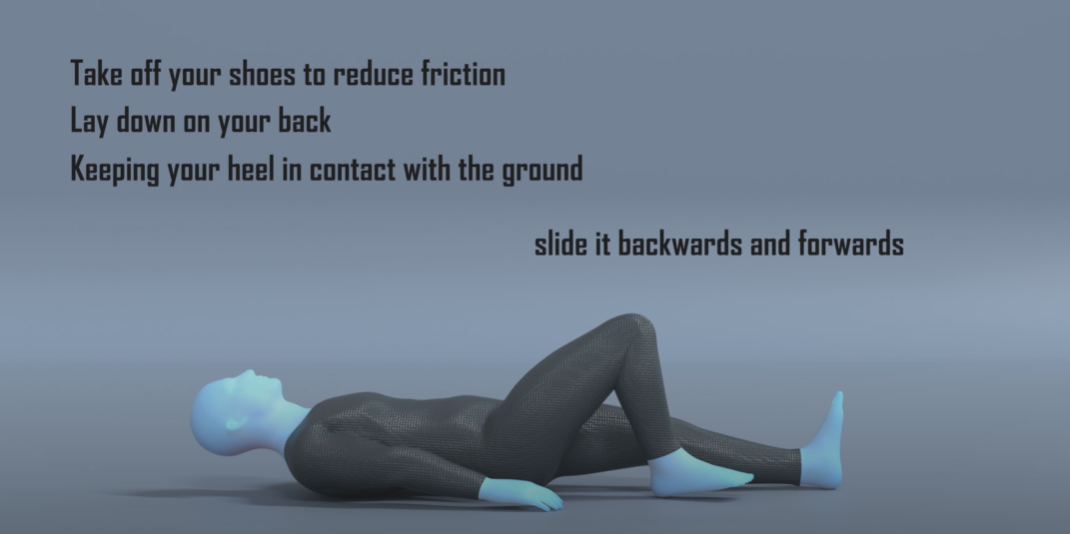
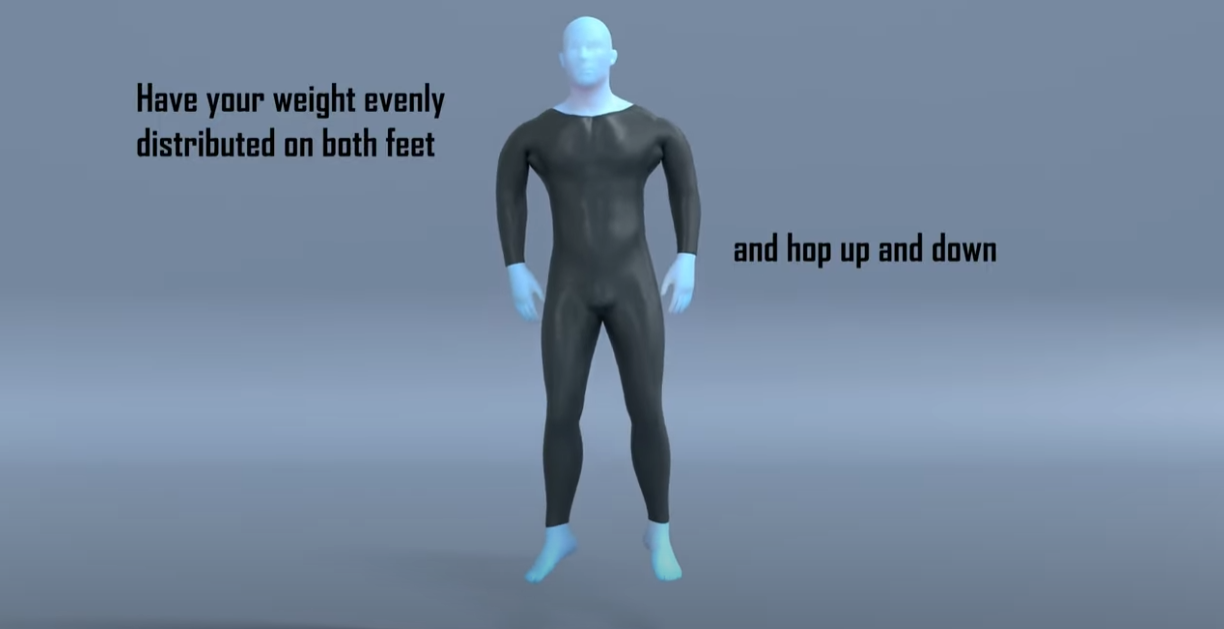
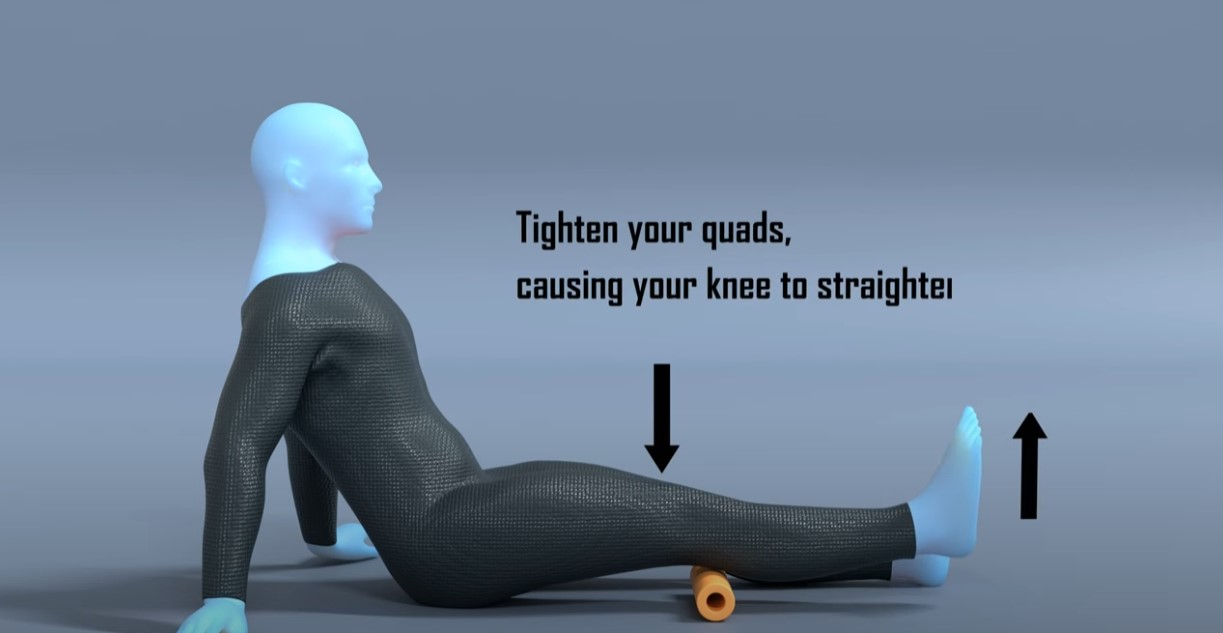
In this acute phase you should follow the guidance from the clinical team following the results of your x-ray, and potentially any MRI scan that you had. The exercises here can be started whilst you are waiting to get the x-ray and any other appointments organised, where the aim is to help with blood circulation to the area and to maintain the engagement of the quadricep muscles. With this type of injury and the potential level of pain you may find you are using your leg a lot less, which will result in your quadricep muscles not being activated. It’s really important we keep these muscles engaged and active as much as possible.
The main focus of these two simple exercises in this acute phase is to encourage blood flow to the area and engagement of the quadricep muscles.
Exercise | Frequency | |
Ankle Pumps | 30-60 seconds x 2 sets | 3 x daily |
Static Quads | 12-15 reps x 2 sets | 3 x daily |
Some things to consider with the exercises:
- The duration, sets and frequency you perform these is not set in stone, the important point to remember is to do these little and often throughout the day. This is better than doing them for one big chunk as doing them frequently for a shorter period will mean that the benefits are felt for longer throughout the day.
- Neither exercise should be painful but you may get some discomfort on the static quads exercise so either reduce the intensity you are performing this at, or stop it until your symptoms settle further.
If you have a confirmed patella fracture or PCL damage then please follow the guidance of your clinical team and the timeframes they have given.
However, if the x-ray or MRI were clear and you simply have a knee sprain or patella bruising, then you may follow this programme. This phase would be roughly the first 2 - 4 weeks from your injury.
Education
When you have fallen onto your knee and the kneecap or surrounding soft tissue are irritated, there are certain movements we would expect to be painful. It is not uncommon for kneeling to be irritable because you are simply pressing on an area which is inflamed and bruised, similar to a bruise anywhere in your body there is pain when you press it. Another common movement or activity which can cause irritation is when the muscles on the front of your thigh, your quadriceps, are contracted. This is because the quadricep muscles attach onto your knee cap, and the bursa around your knee are located next to the tendons of these muscles. Now your quadriceps will be contracting with pretty much all daily activities which involve your legs so to completely avoid this is almost impossible. But what you can do is manage the intensity of the activities you are doing to avoid any unnecessary irritation whilst the area is healing. The final movement we would expect to be irritable is bringing your knee into full flexion, bending your knee, as this will be stretching the front of your knee. Similar to the other two activities you need to slowly introduce this movement back into your daily activities.
The important thing to remember and to keep things realistic is that you are unlikely to completely avoid any irritation to the area with general day-to-day activities such as climbing stairs, walking or getting up off a chair. But reducing the particularly high intensity or prolonged unnecessary activities, whilst pacing your daily activities may help you as your knee is healing. So for example you may find that walking for 5 minutes doesn’t cause any pain but walking on uneven ground for 30 minutes does, so in the early stages avoiding activities which cause spikes in your pain is recommended.
There are also a number of non-exercise treatment options which aim to offer support to the knee and reduce the workload on the tendons in the area, or reduce pressure on the bursa and can also to help improve the blood flow as well. These treatment options can be helpful in the first few weeks if general daily activities can cause irritation but shouldn’t be relied upon to rush through your rehab. Don’t be disheartened if a treatment doesn’t work for you as they don’t work for everyone. Similarly don’t be put off by a treatment option which doesn’t work on the first time you try it, it may be the case if you retrial it in a few weeks time it does offer some relief. The non-exercise treatment options offer good symptom relief but generally won’t completely alleviate discomfort in the area. They work well alongside the exercises we have highlighted and make sure your return to running, walking or sport is progressed gradually.
You can continue with the mobility exercises from phase 1, and apply some other treatment options which may alleviate your symptoms.
Exercises
The aim of these exercises is to introduce some basic range of motion work and also ensure the muscles on the front of your legs continue to be worked. With these exercises start off easy and only increase the intensity each week once any symptoms have settled.
Exercise | Frequency | |
Heel Slides | 12-15 reps x 2 sets | 2 x daily |
Seated knee extension | 12-15 reps x 2 sets | 2 x daily |
Inner range quads | 12-15 reps x 2 sets | 2 x daily |
Some things to consider with the exercises:
- Start with 12 reps for the exercises before increasing the repetitions. Aim to complete at least 2 consecutive days at each duration before increasing the length of time, but weekly may be more appropriate. Similar to Phase 1 the reps and sets aren’t too important, especially initially, and you will find that over the first few weeks the amount you can perform
- Performing these exercises after you have had a brief walk so the muscles and joints are warm may make it easier.
- You may find it helpful to do these exercises in a circuit type fashion, where you do exercise 1 for 1 set, followed by exercise 2 for 1 set, then exercise 3 for 1 set, and then restarting
Strapping
Kinesiology strapping is very popular for many musculoskeletal injuries. The idea is that the tape helps support the muscles and tendons at the point of pain, and therefore causes less pain when doing exercises or general daily activities. The evidence for kinesiology strapping is mixed, and because of that some people find it’s really helpful whereas others find it doesn’t offer them much at all.
If you feel you are struggling to progress, or you feel your rehab is a little stagnant, or that general daily activities are still irritable, then it may be helpful to try this.
You can leave the tape on for up to 5-7 days but at any point if it feels hot and itchy take it off straight away. Have a day's rest of no tape before reapplying, and ideally test with a small strip before applying a big amount to you.
This video shows a general strapping method which you may find helpful.
It’s likely that used alongside some of the other treatment methods it may offer some relief, but realistically on its own will not help completely alleviate your pain.
Brace
If you decided initially to use a knee brace, if there is no structural damage to your knee and no fracture, you should ideally be weaning yourself off the brace. By using a brace longer than necessary it can restrict the range of movement in the knee, and also cause some of the muscles to switch off as the brace is helping offer support. Wean off the brace gradually over a number of days or weeks, increasing the amount of hours per day you aren’t using it.
Medication
You should expect to see the usage of medication reduced as you move through this phase. If you always require medication after you perform your exercises or throughout the day it may be the case that the intensity of the exercises and activity is too much and may need to be reduced.
Symptoms
During this phase you should start noticing more times in the day when you are pain free, however it is not uncommon for there to be sharp spikes in pain if you are doing a specific activity. This will improve and the activities which cause irritation should become less. If you continue to perform activities which consistently aggravate your knee, it will continue to cause you pain and perhaps be affecting the healing. You may need to alter the activities in some manner that are causing irritation until you have moved further along in your healing.
In this phase we are looking at between 4 to 10 weeks from your initial injury. Remember if you had a confirmed fracture of ligament damage you should follow the advice of the clinical team responsible for your care.
Remember these timeframes are merely a guide and each case may be slightly different.
Education
Similar to Phase 2 the timelines here are merely a guideline and may vary. You may find that you are able to start this phase before 4 weeks if the symptoms have settled and you are no longer challenged by the exercises in Phase 2, and have no pain on daily activities.
The aim of Phase 3 is to increase the intensity of the rehab and introduce more functional movements to the exercises. During this phase you will find you can perform more day-to-day activities with ease, and towards the end of this stage you may be looking to return to running and sport.
You should at this stage be able to perform the exercises from Phase 2 with ease, and not reliant on any pain medication to perform tasks.
If after four weeks since the injury and you have reduced the level of activity you are performing, you are still struggling and finding that your symptoms are not settling, it may be helpful to explore further investigations to rule out any fracture or other structural damage. Speak with your physiotherapist or family doctor to arrange this scan. If however you have continued with the same level of activity since your injury, simply reducing the demand on the knee for a short period of time may alleviate your symptoms on its own.
Exercises
You may find that you want to continue the exercises from Phase 2 as they are low level and will still offer benefits, along with acting as a warm up before these new exercises. Realistically if you are progressing well the exercises from Phase 1 will have minimal benefit at this stage.
The aim of these exercises is to increase the intensity of strengthening in the leg and also make sure the quads muscle isn’t tight. After a period of reduced activity you would expect your strength in your leg to have reduced, and with the initial pain in your knee from the injury you would expect your quad muscles not to have been stretched to their full length whilst you have had reduced range of motion.
Exercise | Frequency | |
Double leg hip bridge | 10-15 reps x 4 sets | 1 x daily |
Sit to stand or Squats | 8-12 reps x 4 sets | 1 x daily |
Quad Stretch | 30 - 60 seconds x 4 sets | 1 x daily |
Some things to consider with the exercises:
- Similar to the previous phase, start with the lower rep count and complete two days at that level before progressing up. Remember as well to have that 1 minute rest between sets.
- With the resisted knee extension start with a low level resistance band and make sure the movement is smooth and controlled.
- The sit to stand exercise is easier than the squat exercise. If you struggle with the sit to stand exercise, raise the height from which you perform this movement from, this will make it easier to perform. If your balance is your limiting factor here, you can gently hold onto something to give you some support. Your aim should be to have equal weight bearing on both feet, but it may be the case you need to progress on to this. If you are struggling performing the squat then regress to the sit to stand exercise. If you are able to perform the squat and it eventually gets too easy, you can progress this and hold some weight during the movement.
- Any discomfort you experience from these exercises should settle within 30 minutes of completing the exercises and your daily symptoms or irritation should not increase.
- You may find it helpful to do these exercises in a circuit type fashion, where you do exercise 1 for 1 set, followed by exercise 2 for 1 set, then exercise 3 for 1 set, and then restarting.
Foam Roller
A foam roller is used to offer self massage. They are marketed as a way to get similar results of a massage but without the reliance of a masseuse, making it more practical and cheaper for people to use. They are very popular within the fitness industry and with a lot of professional athletes using them within their warm-up and rehab routines. The idea is that similar to massages they increase blood flow to the area and also help with mobility by reducing muscle tension. Unfortunately the evidence on them having an effect on muscle length is minimal, and any change is short term, and the link that they reduce injury or improve rehab times is simply missing. Similar to the strapping treatment, a foam roller can help ease some of your symptoms but may not be effective for everyone. The idea here is that you would use the foam roller to massage your quad muscles with the aim to reduce the tension these muscles are putting onto your kneecap, hopefully leading to reduced pain and improved mobility. Do not foam roller directly over your knee as this will be painful and of no benefit.
This will be roughly 10 - 12 weeks onwards following the start of your rehab.
Education
Some people may not need to progress to this phase and the exercises and advice from Phase 3 may be enough for what they need.
If you have a desire to return to running or sport then you should continue with this phase.
Here we focus on performing exercises that are more dynamic and to mimic the demands of running, along with a bias onto the single leg. As we introduce impact work into the rehab programme you need to be conservative in these sessions and build up slowly. For the first week performing these exercises follow the rule that you want to leave each session wanting to do more. You do not want to finish the session and be in pain thinking that you have ‘now worked hard enough’. Starting impact work is a big step and generally what most people find the hardest. You want to be patient and not rush things, undoing all of the good work you have done up until this point.
A simple test if you have access to a leg press machine in a gym, is to see what your 1 rep max leg press is and compare it to your other leg. If you don’t normally use this piece of equipment some guidance from a Physical Trainer in the gym would be advised. What you are aiming to see is that your injured leg should be at 90% strength of your non-injured leg. If your injured leg is much below this number it may not have the strength to cope with the demands of running. Another way to test without a specialist kit is doing a single leg sit to stand test, where you count how many single leg sit to stands you can do on the injured side and compare it to the non-injured side. Similarly you want to be at roughly the same amount of reps for each side. Now these two tests are slightly different in that one will test max strength and the other more muscular endurance, but both will offer some insight depending on your access to equipment.
The second test you want to perform is the single leg hip bridge exercise. On the unaffected side initially perform this exercise for 20 reps and then repeat it on the other side. Was there a difference in fatigue or pain? If so it gives a good indication on what you need to work on. If there was no difference, repeat the test but increase the rep range to 30. You ideally want to be at 90% of effort needed to match the reps or 90% of the reps completed before moving onto any return to running or sport.
The exercises in this phase can help address any loss in single leg strength and will also help improve your single leg control, which will be crucial for any return to running or sport.
At this stage you should be able to perform the exercises from Phase 3 with ease, have no discomfort with daily activities, and have stopped any medication to alleviate symptoms.
Exercises
Using the exercises from Phase 3 will help as a warm up before completing these exercises. Performing 2 sets of the exercises from the previous phase before these will offer you a good base.
Exercise | Frequency | |
Hopping on the spot | 30-60 seconds x 4 sets | 3-5 x weekly |
Side to Side hopping | 30-60 seconds x 4 sets | 3-5 x weekly |
Some things to consider with the exercises:
- Similar to the previous phase, start with the lower rep count or duration, and complete two days at that level before progressing up. Remember as well to have that 1 minute rest between sets.
- You don’t want to perform these on consecutive days, have a rest day between so you can allow time for your body to get used to the extra demand. .
- You may find it helpful to do these exercises in a circuit type fashion, where you do exercise 1 for 1 set, followed by exercise 2 for 1 set, and then restarting. You could also include some of the exercises from the previous phase to increase the length of the circuit.
- If you intend to return to running, complete at least 2 weeks of these exercises and then follow our run/walk programme alongside these exercises as you progressively build up.
Return to Sport or Activity
As a general rule, try and aim for two pain-free sessions at a reduced duration or intensity before increasing.
For example, if you normally play 60 minutes of tennis, aim to play for 30 minutes in a non-competitive environment for two non-consecutive days.
Having a day's rest between sessions allows you to have appropriate rest and for your body to repair and become stronger.
Once you have found a duration or intensity you can tolerate with no flare up, aim to increase the next session by 10%. This can seem like a slow and conservative process however the research has shown this is the optimum level of increase to avoid an overuse injury. Increasing duration or intensity by more than 10% significantly increases your chance of injury. As you will have been away from your sport for a number of months, you will have lost some of your fitness conditioning in this time and will need to build this up slowly.
Over time you will be able to slowly return to your pre-injury level of activity without regressing back to any acute flare-up.
Pacing
At this stage you should find you can do more day-to-day activities pain free. The temptation here is to go a bit overboard. A nice reminder to pace activities so that you don’t over do it, and that you spread these activities out as much as possible throughout the day.